
Before you mount your Arlo Essential Indoor Camera, make sure you’ve found a good location for signal strength and motion detection.
Note: You must follow the instructions in the Arlo Secure App when you first install your Arlo Essential Indoor Camera. Do not begin mounting your camera before the Arlo Secure App instructs you to during the installation process.
You need the following items to mount your Arlo Essential Indoor Camera:
- A power drill with a 15/64 inch (6mm) drill bit
- A Phillips-head screwdriver
- A pencil (optional)
- The following items that came in the package with your camera:
- Wall plate
- Screws and wall anchors
Note: We recommend using wall anchors when mounting on drywall, brick, or tile. For help mounting your camera with wall anchors, visit: How do I use the wall anchors that came with my Arlo product?
To mount your Arlo Essential Indoor Camera:
- Place the wall plate on the wall where you plan to mount your Arlo Essential Indoor Camera.
- Mark the two holes on the wall plate.
Note: The marks can be used as a guide to drill pilot holes. - Remove the wall plate from the wall.
- Use a 15/64 inch (6mm) drill bit to drill two holes into the wall.
- Place the wall plate back onto the wall, and align it with the two holes in the wall.
- While holding the wall plate over the two holes, use a Phillips-head screw driver to fasten a screw into each hole.
Note: If you want to mount your camera with wall anchors, visit: How do I use the wall anchors that came with my Arlo product?
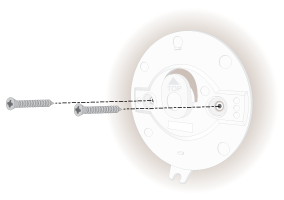
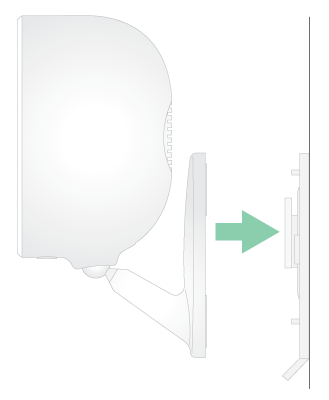
- Align the camera with the wall plate, and push the camera on to the wall plate.
- Slide the camera base down until you hear an audible click.
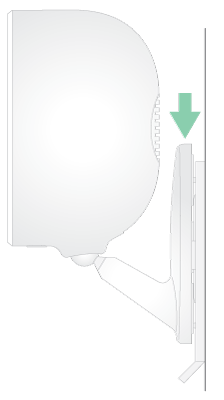
Your Arlo Essential Indoor Camera is securely mounted to the wall.
To dismount your Arlo Essential Indoor Camera, slide the camera up until you hear an audible click, then pull the camera away from the wall plate.